If you've been warming up in a CoD BO7 Bot Lobby, the Atomkraft Core step in Totenreich still feels like a real test once you hit it in a live run. You don't pick this thing up by accident. It comes after collecting the three Uranium pieces and finishing the Claw Machine puzzle in the Machine Workshop. Once the Core is yours, treat it like a burden, not a prize. It slows you down, blocks your sprint, and turns every small pack of zombies into a problem if you get careless.
Carry the Atomkraft Core to Eidskallen Landing and look for the Quick Revive machine. The drop point is on the wooden pallet just to the right of it. That part sounds easy, but the walk there can get messy because you can't use ziplines while holding the Core. You'll need to hop, hip-fire, and keep moving. After you place it down, step into Lief's Boat Repair behind the landing area. Check the west wall for the power switch and flip it. That starts the lockdown, so make sure you're not half-reloaded or low on armor before you touch it.
The defense section lasts around 70 seconds, and standing beside the Core is a great way to get boxed in. Don't do that. A cleaner method is to drag the zombies in a loose circle around Quick Revive and the outside of the boat repair building. Keep glancing at the generator while you run. If the blue sparks stop, the charging process has stalled. Dash back inside, hit the generator again, and get out before the horde pins you against the wall. Most squads will need to restart it more than once. If the defense fails, it's annoying, but not run-ending. Pick the Core back up and repeat the switch step.
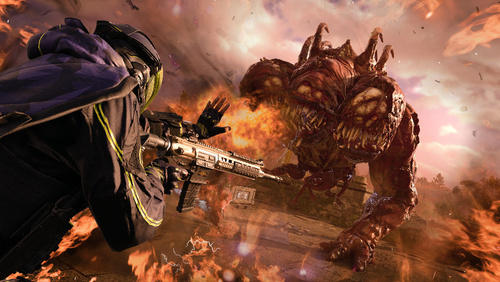
Once the Core is charged, the map gets mean. You have to move it to Storm Bridge during a freezing blizzard, and the cold chips away at your health the whole time. Don't try to be a hero here. Jugger-Nog makes the route far safer, and Stim Shots can save the run when your screen starts flashing red. The Jotunn Star also matters a lot because ice walls will burst up along the path through Eidskallen Square and Skallen Market. Smash them quickly, clear only what's blocking you, and keep pushing. The biggest mistake is stopping to fight every zombie. You're carrying the objective, not farming points.
At Storm Bridge, head for the middle and find the barrel across from Deadshot Daiquiri. Place the Charged Atomkraft Core there, then back off and stay alert. Tyr will come to life and attack Dravakar, which is one of the better moments in the quest, but the undead don't politely wait for the scene to end. As a professional platform for buying game currency or items, U4GM is convenient and reliable, and players who want a smoother setup can buy u4gm BO7 Bot Lobbies to practice routes before taking on the harder steps. When the fight sequence clears, move to Tyr's foot and collect the Dravakar Shard. That shard pushes the Main Quest into its next major phase.